Microsoft Word Help Microsoft Access Help Microsoft Office Help Page Microsoft Excel Help Microsoft Publisher Help
Microsoft Word Microsoft Access Microsoft Office Main Microsoft Excel Microsoft Publisher


Microsoft PowerPoint 2000


Introduction into Microsoft PowerPoint
Starting Up Microsoft PowerPoint
Creating a Presentation
Opening an existing Presentation
Creating a Blank Presentation
Different PowerPoint Views
Slide Manipulation
Slide Animation
Slide Transitions
View Slide Show
Navigating While in Slideshow
Pack up a presentation for use on another computer


Introduction into Microsoft PowerPoint
Microsoft PowerPoint is a powerful tool to create professional looking presentations and slide shows. PowerPoint allows you to construct presentations from scratch or by using the easy to use wizard.

This tutorial will help you get started with Microsoft PowerPoint and may solve some of your problems, but it is a very good idea to use the Help Files that come with Microsoft PowerPoint, or go to Microsoft's web site located at
http://microsoft.com/office/powerpoint/default.htm for further assistance.

Back to top


Starting Microsoft PowerPoint
  • Two Ways

    1. Double click on the Microsoft PowerPoint icon on the desktop.

    2. PowerPoint Icon On Desktop
    3. Click on Start --> Programs --> Microsoft PowerPoint

    4. PowerPoint from Start Menu

Back to top

Creating & Opening a Presentation
After you open up Microsoft PowerPoint, a screen pops up asking if you would like to create a New Presentation or Open An Existing Presentation.


Back to top

Opening An Existing Presentation
  1. Select Open An Existing Presentation from the picture above
  2. Click on your presentation in the white box below step 1
    • If you do not see your presentation in the white box, select More Files and hit OK.
    • Locate you existing Presentation and hit the Open button

Back to top

Create a Blank Presentation
After you select Blank Presentation a window pops up asking you to select the layout of the first slide.

New Slide Layout
Pre-Designed Slide Layouts (Left to Right)
  • Title Slide
  • Bulleted List
  • Two Column Text
  • Table
  • Text & Chart
  • Chart & Text
  • Organizational Chart
  • Chart
  • Text & Clip Art
  • Clip Art & Text
  • Title Only
  • Blank Slide
NOTE:If you already know what you want in your next slide, it is a very good idea to choose one of the pre-designed layouts from above. However if you do not, then you can still insert what you want in throughout your Presentation anytime you desire. Just choose Blank Slide and insert items as you see fit.
Back to top

Different Views That PowerPoint Demonstrates
There are different views within Microsoft PowerPoint that allow you to look at your presentation from different perspectives.
PowerPoint Views
Normal View Outline View Slide View Slide Sorter View Slide Show View
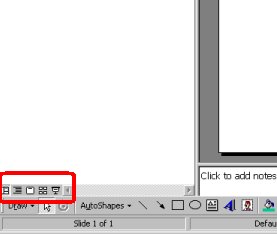
Switches to normal view, where you can work on one slide at a time or organize the structure of all the slides in your presentation Switches to outline view, where you can work with the structure of your file in outline form. Work in outline view when you need to organize the structure of your file. Switches to slide view, where you can work on one slide at a time Displays miniature versions of all slides in a presentation, complete with text and graphics. In slide sorter view, you can reorder slides, add transitions, and animation effects. You can also set the timings for electronic slide shows. Runs your slide show in a full screen, beginning with the current slide if you are in slide view or the selected slide if you are in slide sorter view. If you simply 
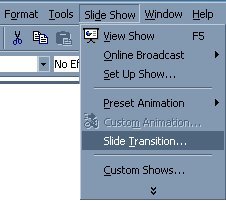
want to view your show from the first slide:
  1. Click Slide Show at the top of the screen
  2. Select View Show

Back to top

Slide Manipulation
  • Inserting A New Slide
    1. Click Insert at top of screen
    2. Select New Slide
    .
  • Formatting A Slide Background
    • You can format your slide to make it look however you would like, whether it be a background color, picture, or a design template built into Microsoft PowerPoint. The next step will show you how to apply a Design Template, but the other items mentioned above can be accomplished the same way.
      1. Click Format at the top of the screen
      2. Select Apply Design Template
      3. Select Design you wish to apply
      4. Click Apply Button

  • Inserting Clipart & Pictures
    1. Display the slide you want to add a picture to.
    2. Click Insert at the top of the screen
    3. Select Picture
    4. Select Clip Art
    5. Click the category you want
    6. Click the picture you want
    7. Click Insert Clip on the shortcut menu
    8. When you are finished using the Clip Gallery, click the Close button on the Clip Gallery title bar
    9. Steps 1-4 are very similar when inserting other Pictures, Objects, Movies, Sounds, and Charts


Back to top
Adding Transitions to a Slide Show

You can add customized transitions to your slide show that will make it come alive and become appealing to your audience. Follow these steps when adding Slide Transitions.
  1. In slide or slide sorter view, select the slide or slides you want to add a transition to.
  2. On the Slide Show menu at the top of the screen, click Slide Transition
    Slide Transitions
  3. In the Effect box, click the transition you want, and then select any other options you want
  4. To apply the transition to the selected slide, click Apply.
  5. To apply the transition to all the slides, click Apply to All.
  6. Repeat the process for each slide you want to add a transition to.
  7. To view the transitions, on the Slide Show menu, click Animation Preview.

Back to top

Viewing The Slide Show

You can view your slide show by any of the following ways:
  1. Click Slide Show at the lower left of the PowerPoint window.
  2. On the Slide Show menu, click View Show.
  3. On the View menu, click Slide Show.
  4. Press F5 on the keyboard

Back to top

Navigating While In Your Slide Show

  • Forward Navigation
    • Simply click on the left Mouse Button or hit the Enter Button on your keyboard
  • Reverse Navigation
    • Hit the Backspace on the keyboard
  • Exiting the show
    • Hit the Esc Button on the keyboard

Back to top

Pack up a presentation for use on another computer

  1. Open the Presentation you want to pack
  2. On the File menu, click Pack and Go
  3. Follow the instructions in the Pack and Go Wizard.

Unpack a presentation to run on another computer

  1. Insert the disk or connect to the network location you packed the presentation to
  2. In My Computer, go to the location of the packed presentation, and then double-click Pngsetup
  3. Enter the destination you want to copy the presentation to

Back to top