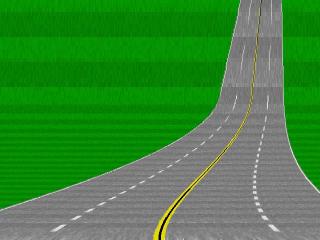
The hills in this game come at you like a solid wall. The turns are also very exaggerated. The engine seems quite flexible and deals with multiple roads simultaneously, as well as being able to show the height of one road relative to another.
V0.4 Changes:
V0.3 Changes:
V0.2 Changes:
Source code
Source code is now available here! Please read LICENSE.TXT before starting, and feel free to e-mail me with any questions.
Introduction
Now that every system can produce graphics consisting of a zillion polygons on the fly, why would you want to do a road the old way? Aren't polygons the exact same thing, only better? Well, no. It's true that polygons lead to less distortion, but it is the warping in these old engines that give the surreal, exhillerating sense of speed found in many pre-polygon games. Think of the view as being controlled by a camera. As you take a curve in a game which uses one of these engines, it seems to look around the curve. Then, as the road straightens, the view straightens. As you go over a blind curve, the camera would seem to peer down over the ridge. And, since these games do not use a traditional track format with perfect spatial relationships, it is possible to effortlessly create tracks large enough that the player can go at ridiculous speeds-- without worrying about an object appearing on the track faster than the player can possibly react since the physical reality of the game can easily be tailored to the gameplay style.
But they have plenty of drawbacks as well. The depth of physics found in more simulation-like games tends to be lost, and so these engines aren't suited to every purpose. They are, however, easy to implement, run quickly, and are generally a lot of fun to play with!
It is worth noting that not every older racing game used these techniques. In fact, the method outlined here is only one possible way to do a pseudo 3d road. Some used projected and scaled sprites, others seem to involve varying degrees of real projection for the road. Enjoy!
Drawing the Initial Road
The way you want to think about the road is not in terms of polygonal shapes, but as a collection of horizontal lines. When we see a straight road, we see two lines narrowing into the distance. But we have to approach this problem differently if we hope to program it in a fast and flexible manner.
So what we'll do is start at the front (bottom) of the screen, and make everything relative to the center of the road. What we will keep track of is half of the width of the road. Each line of the road will be drawn to the left and the right of the center. As we move up the screen, we decrease the size of this line.
Now we have a strip moving into the distance. What is missing though are road markings to give an impression of distance. Games use alternating light and dark strips for this effect. Since we are dealing with 32-bit systems, we can use the extra power to our advantage. I start with a 'texture' position variable. When this is below a certain amount, the road is drawn in one shade. When it is above that amount, it is drawn in the other shade. The position variable then wraps back to zero when it exceeds the maximum amount, causing a repeating pattern.
It is not enough to change this by a set amount each line though, because then you'll just see several strips of different colors which are not getting smaller as the road goes into the distance. That means you need another variable which will change by a set amount, add it to another variable each line, and then add the last one to the texture position change. So say you are moving through the texture at speed 4. That means that after line one, you are reading the texture at position 4. The next line will be 8. After that, 16. So, this way it reads through the texture faster and faster. This is why I like to refer to these variables as the texture position (where in the texture we are reading), the texture speed (how quickly we read through the texture), and the texture acceleration (how quickly the texture speed increases).
To make the road appear to move, just change where the texture position starts each frame.
Making it Curve
To curve a road, you just need to change the position of the center-line in a curve shape. There are a couple ways to do this.
One way is to do it the way the texture reads were done, with three variables. That is, starting at the bottom of the screen, the amount that the center of the road shifts left or right per line steadily increases. Like with the texture reads, we can refer to these variables as the center line (curve) position, the curve speed, and the curve acceleration.
There are some problems with this method though. One is that S-curves are not very convinient. Another is that going into a turn looks the same as coming out of a turn.
To improve the situation, we'll introduce the idea of road segments. A road segment is a partition which is invisible to the player. Think of it as an invisible horizontal divide which sets the curve of the road above that line. At any given time, one of these segment dividers is at the bottom of the screen and another is travelling down at a steady rate towards the bottom of the screen. Let's call the one at the bottom the base segment, because it sets the initial curve of the road. Here's how it works:
When we start drawing the road, the first thing we do is look at the base point and set the parameters for drawing accordingly. As a turn approaches, the segment line for that would start in the distance and come towards the player kind of like any other road object, except it needs to drift down the screen at a steady rate-- otherwise the road swings pretty wildly.
So, suppose the segment line for a left curve is halfway down the road and the base segment is just a straight road. As the road is drawn, it doesn't even start curving until it hits the "left curve" segment. Then the curve of the road begins to change at the rate specified by that point. As the moving segment hits the bottom of the screen, it becomes the new base segment and what was previously the base segment goes to the top of the road. One possibility is that Final Lap does its complex track visuals by using more than two segments.
To complete the illusion, you need to have a horizon graphic. As the curve approaches, the horizon doesn't change (or scrolls only slightly). Then when the curve is completely drawn, it is assumed that the car is going around it, and the horizon scrolls quickly in the opposite direction that the curve is pointing. As the curve straightens out again, the background continues to scroll until the curve is complete. If you are using segments, you can just scroll the horizon according to the settings on the base segment.
Perspective-style Steering
It's much less interesting looking to have a game in which when you
steer, it only moves the car sprite. So, instead of moving the player's car sprite, you keep it in the center of the screen and move the road-- more importantly, you move the position of the center-line at the front (bottom) of the screen. Now, you want to assume that the player is going to be looking at the road always, so make the road end at the center of the screen. You'll need an angle-of-road variable for this. So, calculate the difference between the center of the screen and the position of the front of the road, and divide by
the height of the road's graphic. That will give you the amount to
move the center of the road each line.
Placing Objects and Scaling
When you play a lot of old racing games, you'll notice that the signs
and such move a lot slower than the road. What you want though is
a consistant coordinate system. I kept track of the distance of an object in terms of how many texture positions away it was. So, when drawing, I'd keep track of how many texture positions had elapsed since starting to draw. That'd give me the location on the screen on which to insert a given object. So, say we have a sign at position 10, and our texture position changes by 4 each line. On the first line, we have changed our texture by 0. On the second line, by 4. Third line, by 8. So far we have accumulated 12 texture positions since we started drawing. Now, our object is at 10, which is less than 12, so we'd insert it on this line. The good thing about doing it like this is that it is completely consistant with the ground movement. If the starting texture position changes by 30 per frame, each object would move closer by 30 positions each frame too.
Now, we have a problem: The objects overlap in the wrong order! What you will want to do is draw them back-to-front. To do this, you'll have to note in advance where on the screen each object should be drawn and then draw them in a different step if you are using method #1. However, those using a sine chart to curve the road can at this point do everything in one pass, from back to front.
The x coordinate of an object was in terms of a percentage away from the center line of the road. So, the road stretched from -100% to +100%. Anything outside of this was drawn on the grass, such as road signs. This is easy to calculate using our center of the road variable-- just multiply! As for scaling, you'll want to use the same sort of percentage-of-the-road-width calculation to find the size of your sprite.
Storing Track Data
When I did my road demo, I stored the level information as a list of events which would happen at specified distances. The distances are, of course, in terms of texture position units. The events would consist of commands to begin and stop curves. Now, as far as I can tell, the speed at which the road starts and stops curving is arbitrary. The only rule seems to be that it must correlate to the speed of the player vehicle (except for in Method #3, which was already covered). An easier way to do the track data would be to split the track into different pieces. Each track piece would correspond to one drawn segment of the track.
Texturing the Road
Now, you probably would like a real graphical texture on your road
instead of the alternating lines and such that you have at the moment.
There are a couple ways to do this. A cheap and easy way to do it is
how Outrunners seems to do it. That is, you have a couple of textures for the road (for the alternating line effect).
When each horizontal line of the road is drawn, you stretch the texture to fit the width of that line. You can just flat-scroll the
textures to simulate some sort of movement, moving one line down the texture for each line on the screen.
If you want the road to look more accurate, make the texture position on your road variable then corresponds to a line number on the graphic. Voila! One textured road!
Hills
It seems there are a near infinite number of ways to produce hill effects. One thing we could do is to use the segment system we used for the curves for the hills. Much like the curves, you would have a hill acceleration variable and a hill speed (or degree) variable. To explain how the hill degree variable works, it is best to use examples. Suppose we set the hill degree to 0.5. This would draw the road twice as high as normal. If the hill degree is set to 2.0, this would draw the road half as high as normal. Of course, to get a rolling hill we must let the segments change the curve acceleration factor and not just the curve degree.
In my Outrun-style engine, I used segments as with the curves which would affect the hill variable. I then multiplied the narrowing of the road and the texture position incrementer by this number. One interesting side effect is that on downhills, the drawing distance is decreased while the drawing distance is increased on uphills. What I did with objects which were beyond the drawing distance is curve them below the road.
Now, we have to move the horizon to convince the player. I like to use a Lotus-style background in which the horizon doesn't just consist of a skyline but also a distant ground graphic. The horizon should move upwards on downhills and downwards on uphills, but unlike the curves the background should begin to move when the next segment is the hill and not the current one.
The Gallery
Here is a collection of screenshots that show various ways to do unorthodox road engines. Take a look!
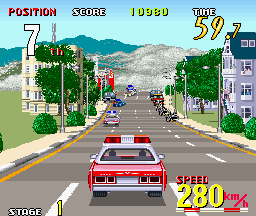
Cisco Heat
The hills in this game come at you like a solid wall. The turns are also very exaggerated. The engine seems quite flexible and deals with multiple roads simultaneously, as well as being able to show the height of one road relative to another.
Pole Position

This is the first smoothly running pseudo game I remember. Not extremely impressive today graphically.
Hydra
This is another Atari shoot em up along the lines of Roadblasters. It features a very nice jumping effect in which the road layer's perspective tips, causing the closest objects to fall off the screen. It also nicely projects objects of varying distances above the ground.
Outrunners

This sequel to Outrun is a prime example of rollercoaster-like hills in a racing game. Everything is quite exaggerated in this, and the result is one of the most blinding fast yet nicely controllable racing games ever.
Road Rash

In the 32-bit generation version of Road Rash, everything was textured and buildings were cleverly drawn next to the roadside, leaving some people with the impression that it was a purely polygonal game running fast on the 3do. However, the way objects whip around the corners, buildings warp, and that you can't go backwards would seem to give away that it's not really a polygon engine. The sharp lines on the pavement do hint at some sort of projected segment system though. The tracks have a lot of detail and variety.
The 16-bit generation Road Rash was also no slouch, also featuring a flexible engine with a tiny bit of faked texuring (but was slow).
Turbo

This predates Pole Position and also features hills and bridges. The drawback? There are no transitions from hill to bridge to curve. This used analog graphics scaling hardware.
Spy Hunter II
I don't know what the makers of Spy Hunter II were thinking. Nice idea, bad execution. The road effects seem very similar to Turbo's with a little more in the way of transitions.
Pitstop II

This technique is so quick that on the lowly Commodore 64, people were able to pull off a split screen racing game.
Enduro
Enduro demonstrates the use of pseudo 3d on the Atari 2600.
Enduro Racer

Not to be confused with Enduro, this was a sort of 3d Excitebike-like game. The screenshot shows off the hill technique. Hills are rather sharp, flexible, but generally don't affect the horizon's position, so I'm guessing interpolated points. I was once kicked out of an arcade for being too rough on the Enduro Racer machine.
Lotus
Lotus comes through with the perfectly curved hill technique. One interesting thing is that Lotus will draw the road's top below the horizon and then fill the gap with a solid color to imply a downhill.
Test Drive II
I'm not sure exactly what to make of Test Drive 2's graphics. While clearly not a polygon racer, it tries very hard to realistically represent a variety of roads. The game is similar to the Need for Speed series but predates it by several years.
Speed Buggy

When you steer in this, in addition to shifting the perspective, the road also slides left and right a little.