MAKE YOUR OWN
DOWN QUILT
Contributed by: Jeremy Padgett (Hungry Howie), 1/08/01
My Homemade
17oz 20*F Sleeping Quilt

If you have
ANY questions about the following, please email
me
Introduction
Quilts vs.
Tradition
The Low Down
on Goose Down
Construction
Materials
So what's the
plan?
Before you
start...
Gentlemen,
Start your sewing machines!
One year down...an
ongoing review of the quilt
Introduction
I came up with
several ideas for design while hiking the Appalachian Trail in 2000. All,
of course, in the interest of making life on the trail more comfortable
and efficient while cutting and slashing weight wherever possible. Since
you really have nothing more to do while hiking than think about all sorts
of really neat stuff, by and by I eliminated most of my ideas as unrealistic,
too difficult, or dangerous. But the quilt idea was a reoccuring one that
even made a few preliminary drawings in the back of my journal of which
I would later refer to as I began this project later in the fall. This
was my first major gear construction project, and certainly my first sewing
project (other than sewing the bottom of my pack up after dragging it 2000
miles), and looking back, it wasn't the easiest project to have started
on. However, after making several prototypes out of inexpensive fabric,
I felt comfortable enough to try my hands at the real thing. I have been
very pleased with the outcome of the quilt and have so chosen to share
it, and the process, with you in order to promote and inspire the making
of homemade gear. This is meant to be a comprehensive packet explaining
everything you'll need to make your own down quilt to your own specifications.
I have only one rule: make this your quilt. Feel absolutely free to cut,
whack, add, or modify wherever the need strikes you.
Quilts vs.
Tradition
"Without tradition,
our lives would be as shaky as...the fiddler on the roof"
Traditionally,
hikers have used sleeping bags to keep warm at night, a tried and true
method of staying comfortable. However, several sources including myself
have begun to question Why. There are two types of insulations that man
has developed: loft and radiation. Either there must be dead air space
as in loft or there must be reflection as in radiation. Due to the importance
of breathability of a sleeping bag/quilt, using radiation to a significant
degree would be avoided in order to maintain maximum loft and vapor transfer.
The first type of insulation, dead air space, is what is used in sleeping
bags and in most insulation found today here on Earth. It works on the
principle of tiny particles trapping heat produced by a generator (i.e.
your body) and keeping them warm by discouraging convection (air movement).
If convection takes place, warmth will be lost. Therefore, the particles/fibers
that fill the space must be very fine to prevent convection altogether.
The wider the dead air space you have, the warmer it will be. Likewise,
the thinner the dead air space you have, the less good it does you. Therefore,
it could be said that your sleeping bag/quilt must have a certain amount
of fluffiness to keep you warm at a certain temperature. When you lie on
the bottom part of your sleeping bag, all of the insulation under the body
is crushed and is therefore no longer useful insulation (It should be said
at this point that heat rises). Since you already use a sleeping pad, and
they were made first for insulation from the ground and second for comfort,
trends leaning towards lighterweight gear would seem to suggest that chopping
off the bottom of your sleeping bag would save you a good deal of weight
at no loss of function. Although this is a crude generalization, and there
are compromises on each side of the argument, using a quilt instead of
a bag in conditions that permit will save a hiker a significant amount
of weight and bulk in the pack.
Note: Quilts
have their limitations. They are not designed for four season camping or
in situations where extreme weather conditions and variations are expected.
Always play it safe!
The Low
Down on Goose Down
There are two
primary types of insulations used in today's sleeping bags and insulative
clothing: goose down and synthetic. Goose down, of course, is harvested
from geese. It is measured by fil power, or how many cubic inches one ounce
of down will fill. Common fill power ratings are 550, 600, 650, 700, 750,
and 800. If one ounce of 550 fill down will fill 550 ci, and once ounce
of 800 fill down will fill 800 ci, and this project requires about 10,000
ci of dead air space, than the 800 fill down would save you nearly half
a pound! Synthetic insulations aren't measured by fill power, rather by
recency, which usually indicated the "latest greatest" one out. Some synthetic
insulations (from oldest to newest) include Holofil, Holofil II, Holofil
808, Primaloft, Polarguard, Polarguard HV, Polarguard 3D, and Polarguard
Delta. Compared with high quality goose down, synthetic insulations are
universally heavy, bulky, and less resilient. On the plus side, however,
the are less expensive and retain loft better when wet.
I never reccomend
that hikers use synthetic insulations, especially those concerned with
weight, bulk, or longevity of thier bags. The most popular reason that
people tend to shy away from using down is that they are advertised to
lose their loft (along with their warmth) when they get wet. I've seen
people so scared of being cold in a down bag that they'd probably refuse
one even if there were no alternative. While it is true that down will
lose much of its loft when wet, it must be absolutely soaking wet for this
to happen. What isn't publicized, however, is that synthetic insulations
too lose much of their loft when wet. So what is the defining diference
between the two? Synthetic insulations in general will regain their loft
much quicker after being wet. In reality, no matter which insulation you
rely on for warmth, you must take proper precautions to ensure that your
bag will stay dry.
Construction
Materials
In order to
construct your quilt, you will need a nylon ripstop material for the inner
and outer shell of the bag, no-see-um or tricot stretch mesh for the inner
baffles, down (preferably high quality of at least 700 fill) for the insulation,
and 100% Polyester Thread. All quantities will vary, but we'll go over
that in a little while. As far as purchasing materials, there are a number
of textile outfitters available through the internet. I bought most of
my materials through Outdoor
Wilderness Fabrics, however, Thru-Hiker.com
now offers a kit for this project which will save you the hassle of running
around to several different places. When ordering you down, be sure
to order 10% more down that you'll need because of its tendancy to float
away. To figure out how much down you'll need, you first need to know
the temperature that you want the quilt to be warm to. After determining
your desired temperature rating, using the table below along with the following
formula will help you determine how much down you'll need. Don't forget
to order 10% more than you'll actually need because of its tendancy to
float away.
|
Comfort
Rating in Degrees Farenheit
|
Respective
Loft Height in inches
|
|
40
|
2.0
|
|
30
|
2.75
|
|
20
|
3.5
|
Use the formula
Length x Width x Height = Approximate Volume (cubic Inches) to determine
the approximate volume in cubic inches of your quilt. Divide this Approximate
Volume by the fill power of down that you're purchasing (i.e. 700, 750,
800) to determine how many ounces of down you will need. Don't forget
to add 10% to that number to have a margin of loss when working with the
down.
Example: The
average dimensions of my quilt are as follows: 72-inch length, 45-inch
width, and 2.75-inch height, which would denote 8900 ci. Becuase I used
800+ fill power down, meaning that one ounce takes up at LEAST 800 cubic
inches, . Dividing 8900 ci by 800+ fill power suggests that 11 ounces of
800 fill down will fill my quilt. Multiplying the answer by 1.1 to achieve
a safe margin of loss, I ordered 12 ounces of 800+ fill down.
Considerations
for other supplies and materials
I suggest making
the quilt out of two separate colors: a light color on top, and a dark
color on bottom. This is not an asthetic suggestion, but one more in tune
with performance. A light color will absorb less heat and therefore will
loose less through heat radiation. Thus, it will hold more heat in the
bag when used on top. Because dark colors absorb heat quickly, but also
disperse it quickly, they are suited for use inside the quilt where the
quilt can be turned inside out and dried out quicker in the backcountry.
Also, when the user wishes to not be seen as easily, the darker color can
serve as camouflage in the night. The breathability of a fabric is also
vital. The human body emits nearly a pint of moisture every night during
sleep. A fabric that is not breathable will trap this moisture, encouraging
mildew and loss of loft. It is important to air out a sleeping bag every
morning, in any case, to ensure complete dryness. A fabric that is too
breathable, however, will let too much heat escape right through the individual
threads and will hinder the bags performance. Use a lightweight down-proof
breathable rip-stop nylon. A Durable Water Repellant (DWR) finish will
make a limited amount of moisture (from the outside) bead up and roll off
of the quilt, rather than soaking in. I suggest using an uncoated rip-stop
nylon between 1.1oz and 1.3oz per square yard.
For the baffles,
tricot mesh is best due to its superb durability and ability to stretch.
However, it is sometimes difficult to get and in which case, it's lighter
and less expensive cousin, no-see-um mesh will do just fine.
There is only
one stipulation for your thread: Make sure it is 100% Polyester thread.
No cotton core stuff, it MUST BE 100% Polyester. Cotton thread, even cotton
core, will rot fast in the field, leaving you in quite the predicament.
Use the smallest needle that you can find, the smaller the needle holes,
the more difficult it will be for down to escape. I used a size 9 needle.
What I Used
5 yards of
1.1oz NON-coated Rip-Stop Nylon (Sky blue, black)
2 yards of
Slate colored No-See-Um mesh netting (different color than shell fabric
makes it easier to see)
12oz of 800+fill
Feathered Friends Down
100% Polyester
Thread
Note: It
is important to keep in mind that I'm a little guy at 5'10" and 140lbs.
I suggest buying some inexpensive fabric to figure out your dimensions
beforehand.
So
What's the Plan?
 What
you'll need to cut:
What
you'll need to cut:
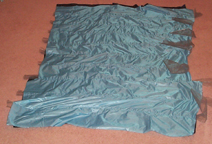
Cut two identical
pieces for to shell. Make one out of the lighter color (for the top) and
the other out of the dark material. Figure 1 to the right illustrates the
dimensions of my quilt, you may need more or less in some areas. You'll
also need to cut 6-inch strips to use as your baffles (see figure 2)
Remember
to add two inches on each side for seam allowance!
After you get
to step 5, you'll also want to measure and cut two pieces of fabric for
use as a footbox. They will measure about 14"x 9"x 10"x 9" all the way
around, but you won't know the dimensions exactly until you get there.
Before
You Start:
Here are a
few tips that might help you along the way:
To better acquaint
myself with the art of sewing, I made several prototypes before beginning
on the final draft. I made these with $1.00/yard fabric and sewed away.
It doesn't matter how many mistakes you make when money's not a factor.
It will help
if you complete steps one - four the night before you begin. Still allow
for two more days of sewing.
Unless you
are a tailor, your bag will NOT be perfect. Such is the reality of making
one's own gear. As long as it works, it is beautiful in my eyes and, I'm
sure, in yours.
Set your Sewing
Machine to 8-10 stitches per inch
Use Scotch
Tape to make all marks on the fabric. This will eliminate marking the fabric
with markers and/or chalk. Scotch tape peels off as you sew.
How to Make
Your Own Down Quilt
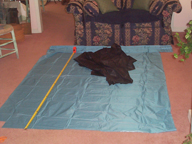 |
Step One:
Spread out the fabric on a spacious floor. Measure and mark your dimensions.
Cut out the pattern. Using Scotch Tape (instead of marking the fabric with
a marker) "mark" your baffles onto the fabric. Scotch Tape peels of easily
but do not sew ON it, sew above or below it. Baffles should be 5-7 inches
apart (mine are 7) starting from the foot. |
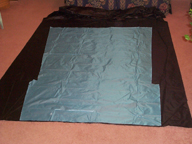 |
Step Two:
Spread out the other piece of fabric on the floor and lay your pattern
(baffle marks down) on it. Tape if necessary. Cut out the pattern on the
second piece of fabric. Using the First piece as a model, mark the new
piece with scotch tape indicating where the baffles are to be placed. Finish
Marking the Second piece after removing the first piece.
From Hereon
out, the first piece will be referred to the top, and the second as the
bottom. |
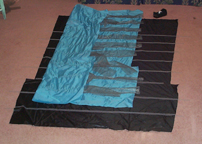 |
Step Three:
Cut the No-See-Um netting into strips. These will be your baffles. Make
them one inch taller than you need them. You will tuck them under to form
a stronger bond when sewing. Using the guides that you have made from Scotch
tape, sew the strips of netting onto the top fabric, remembering to peel
off tape after EACH baffle (otherwise it will be impossible to take it
out). |
 |
Step Four:
Sew the Baffles, which are now connected to the top, to the bottom piece.
Again, peel of the tape as you finish EACH baffle. |
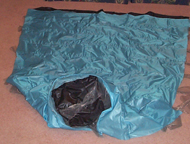 |
Step Five:
Measure the foot width of the fabric. Make, mark, and cut your foot box
piece accordingly. Sew a baffle onto the inside of the outside foot box
piece. Sew the outside foot box piece onto the foot of the bag inside out
as to hide the stitching. Also sew the bottom ridgeline up to the knees
in the same fashion. |
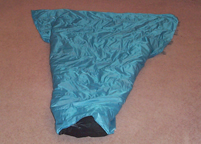 |
Step Six:
Turn the bag wrong side out. Sew the inside foot box piece to the foot
box baffle. Sew the inside foot box piece to the foot of the bag 3/4 of
the way around. Leave the rest until you stuff. |
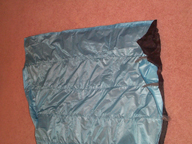 |
Step Seven:
Sew up one side of the bag, leaving one open to stuff. You are now ready
for the "Quarantine" part of making a down bag. |
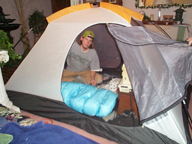 |
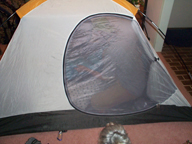
Step Eight:
Set up a tent inside your house where there is NO breeze but plenty of
light. Vacuum it. Set up your Sewing Machine inside. Take in with you the
following: your quilt, seam-rippers and scissors, scotch tape, water spray-bottle,
down. Keep the vacuum cleaner just outside waiting for cleanup. DO NOT
TAKE ANYTHING IN THAT YOU DON'T WANT COVERED IN DOWN. Thinking through
your final steps and mumbling your final prayers (this is where the morbid
organ music begins) go through what you about to do. |
 |
Step Nine:
Close ALL doors and windows. Stuff the foot box and sew it up. Stuff the
remaining compartments and TAPE them as you go. This will allow you to
redistribute down amongst the compartments if you have put too much or
not enough in a certain compartment. |
|
Step Ten:
After you are satisfied, begin sewing the baffles closed. I began at the
top, working my way down. It worked for me. After reaching the bottom ridge
at the knees, switch to the other end and work your way back. Try it out
inside the tent. Go back and double stitch around the outer seams and around
the inside foot box. Vacuum the remaining down off of the tent and yourself.
Then vacuum the tent and yourself again. Do it again, and again, and again. |
CONGRATULATIONS!
One Year
Down...an ongoing review of the Quilt
I made my quilt
in November of 2000, after finishing my northbound thruhike of the Appalachian
Trail. Although my testing into late Sping of 2001 was nothing more than
essentially backyard testing, I used the quilt on two major hikes this
year. The first hike was on the Appalachian Trail between the southern
boundary of the Great Smoky Mountains National Park and Amicalola Falls
State Park, between May 21 and 31, and the second was on a thruhike of
the Long Trail in Vermont, from Massachusetts to Canada, between July 10
and August 3. Dispite the seemingly warm temperatures of these months,
on both trips I managed to push my quilt to its limits. During my preliminary
testing, I reported a probable temperature rating of 20°F for the quilt.
Although it will most certainly keep you alive at this temperature, and
you may even be quite comfortable at this temperature when you're at home
eating foods out of the fridge and microwave, after getting into a lean
trailshape, I found the bag comfortable into the mid-low thirties. You
must also know that yes, I did have clothes on when it was this cold. Generally,
when it was this cold, I would be wearing my hiking clothes (shorts and
Tshirt), expedition weight tops and bottoms, my rain gear, and a balaclava.
And with the addition of a good supper, which of course is important to
retain a good metabolic rate during the night, and an occasional hot cocoa
after the meal, I was usually as snug as a bug in a down quilt.
A quilt definately
takes some time getting used to. I really didn't master the turn-tuck manuver
until I had well over 100 miles on the quilt. One mistake I have made with
mine, is that even with all of my preliminary designs, it is still a tad
too narrow, allowing occasional drafts to work their way through between
the quilt and the pad. Don't hesitate to make it just a tad wider in any
area.
Overall, however,
the quilt has performed beyond my expectations by proving durable, incredibly
light, resilient, and durable, as well as being a conversation piece along
the trail. For extended summer use, I will not hesitate to bring along
the quilt. After all, at 17oz, I can't even feel it in my pack. But when
I'm expecting mid-low 30s, and there is the possibility of lower temps,
I still grab my trusty Marmot bag out of the closet, and stuff it's extra
10oz into my pack where I know I'll stay warmer.
If you have
ANY questions at all, please email
me
Return to: [ Top of This Page ] [ Make Your Own Gear Page ]