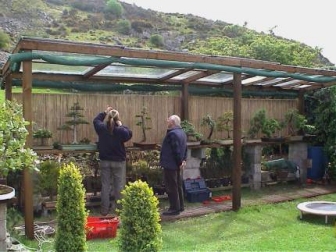
A good display bench is essential for the outdoor display of bonsai. Once your trees have developed to the stage where you are proud of them, keeping them on a purpose built bench has many advantages.
Among these are:-
Healthy growth.
Regular observation allows evaluation and prevents problems from
escalating.
Ease of maintenance.
Improved ramification through equal amounts of UV radiation.
Before you begin to plan your bonsai bench, make certain that the site is the best one possible. Some of the crucial considerations are:-
* Where would you get the maximum benefit and viewing pleasure from a display of your trees? Which area of the garden is best to view from the house?
* The site must be suitable for healthy growth of your trees - would it receive sufficient light? is there enough protection from prevailing winds? Would it be affected by the wind tunnel created between nearby buildings? Is it a low lying frost trap?
* Then there is the question of safety - in terms of potential for damage by children (frequent footballs from next door etc) pets or pests.
* The spot chosen must be convenient for watering and routine maintenance. Somewhere close to an often used path will provide a welcome opportunity for you to stop regularly as you pass. This helps you to observe progress closely, monitor plant health and spot any potential problems in good time.
* Adequate thought must also be given to the security of your treasured possessions. (see my article in last month’s Art Of Bonsai)
Once the site is determined, decide which materials you favour for the construction. There are a few different options. Strength, stability and a pleasing form should be your aim. Timber uprights should be a minimum of 4" X 4".
The price that you can obtain your materials for is likely to be a factor, so look around carefully for the best supplier.
Timber can be obtained from several sources. Reclaimed timber yards may be able to provide you with just the right timber for your job, at a fraction of the normal cost. Check that it is sound i.e. has no insect or fungal damage. For a rustic appearance, aged timbers usually look more attractive as they are well seasoned and therefore should not warp. The only disadvantage is that you must beware of nails when cutting. This is a small price to pay for being environmentally friendly with regard to our forests.
Railway sleepers can be used for a chunky, solid looking bench if available. They have become more expensive but are usually long lasting hardwood with a generous preservative layer of tar or oil. This could be a potential nuisance as it softens in sun and could mark pots or clothing. They also require a fair amount of strength to cut with a bow saw!
If you want a “smoother” finish you will probably have to buy new timber. For this, builders merchants are cheaper than DIY stores. The timber should be tanalised (pressure treated) if possible.
Concrete block may not sound attractive, but benches supported on decorative screen blocks or even flue liners can be very successful. The top is usually built with sturdy timbers. Obtaining blocks from a salvage yard or architectural antiques supplier may help to reduce the price, while also giving "instant age" to the finish.
Another option is brick or breeze block. The initial outlay will be higher but there is the benefit of longevity. If the foundation is secure these can be laid dry, ie with no mortar, but on a very windy site a mortared structure would be best. If there is no footing, such as a patio slab, available it would be best to dig out a footing trench and lay concrete. Stagger the courses just as a bricklayer would. The top can be of sturdy timber nailed to battens to hold them in position, paving slabs or specially cast concrete tops.
Once you have decided on materials, draw up a rough plan. This is probably best done as perspective sketch if you can manage it. Keep altering the dimensions until you are happy with the image. When a final idea has been determined, the rough sketch can be translated into an elevation and plan so that timber cutting lists can be made out.
 If you can learn to use a 3D rendering package on a
computer you can generate an animated “walk around”
view of the proposed bench from all angles. This helps greatly in
determining the optimum timber sizes and highlights construction
details that may otherwise not be obvious.
If you can learn to use a 3D rendering package on a
computer you can generate an animated “walk around”
view of the proposed bench from all angles. This helps greatly in
determining the optimum timber sizes and highlights construction
details that may otherwise not be obvious.

Any timber that hasn't been tanalised should have a good wood preservative applied before construction commences. This can also stain the wood to any colour you require. Be especially thorough on cut ends. Creosote could be used but it tends to fade quickly and you must follow sensible precautions and allow at least one month for harmful chemicals to subside before using the bench for trees. To extend the life of your bench it should be treated with a plant friendly preservative every other year.
Metposts or short steel rod legs raise the timber, preventing rotting at the most vulnerable point where it would otherwise constantly be in contact with damp soil. If steel rods are used, they can also stop many crawling insect pests. e.g. The dreaded Vine Weevil whose female crawls up to lay eggs in any well drained soil. All container plants are therefore at risk.
 Some owners design and build in “pitfall” insect traps such
as a water filled can at the foot of each upright. This is filled
with beer, water or insecticide. It will stop Vine Weevils and
help prevent slugs from reaching their favoured victims such as
Mulberry, Laburnum and Maples.
Some owners design and build in “pitfall” insect traps such
as a water filled can at the foot of each upright. This is filled
with beer, water or insecticide. It will stop Vine Weevils and
help prevent slugs from reaching their favoured victims such as
Mulberry, Laburnum and Maples.
Another alternative is to spread a band of sticky grease around each bench leg. Neither will stop flying pests, like greenfly, but will help prevent crawlers and sliders.
A willing and able helper will make the job much more manageable and should also more than double your rate of progress.
It is a good idea to check the weather forecast before taking out all the tools and materials you are likely to need. Strong winds or rainy conditions will severely hamper progress. Start with the uprights for one end and keep checking for verticality with a spirit level. If legs are being concreted in, they can be temporarily secured by packing around the edges of the hole with bricks etc. Temporary 45&#deg; stays, nailed to pegs driven in well, will stabilise the structure until everything has been finished. Double check all measurements and continue erecting the uprights along the line of bench. Sighting along the edge and/or top also helps to ensure that the line remains straight.
Once they are all in place you can begin to fix the rails and slatted top. Again remember to keep checking that all components are level or vertical.
Once finished, tidy up any verticals that are too high and retreat any cut ends. A second coat of preservative may be applied if desired.
A well proportioned display bench will do far more than just set off your trees. It will give character to the display area, contribute to tree health and even assist in the development of quality specimens.
All Text Diagrams & Photographs © Kevin Bailey 1998 - 2006
On to Security article.
Back to Vale Of Clwyd Bonsai Society Links