The use of desktop computer based packages like PhotoShop and After Effects to produce both 16:9 and 4:3 graphics has increased dramatically over the last few years.
Although these packages produce excellent results there are problems transferring the images to video. Maintaining the correct size, shape, colour and luminance levels of a graphic is obviously very important.
History
What size is a television picture?
There are 576 active lines in a television picture, making it 576 pixels high. A 4:3 image would therefore be:
|
|
(576 x 4) ÷ 3 = 768 pixels wide.
|
|
However this assumes the pixels are square - but television pixels are not square. They have an aspect ratio of approximately 1:1.094. A 4:3 television picture would therefore be:
|
|
768 ÷ 1.094 = 702 non-square pixels wide
|
|
So a 4:3 television image is 702 pixels wide by 576 high.
|
But anyone who has imported graphics from a computer system to the television systems knows the correct width to make the image is 720 pixels! Why - and where did the extra 18 pixels come from?
Digital pictures are effectively wider than analogue pictures by 18 pixels but the 4:3 image sits inside the 720 by 576 area. The additional 18 pixels are required for digital processing and it would be perfectly acceptable to leave them black - but if the image is shrunk via a digital DVE, two 9 pixel wide black stripes will be seen at the sides.
The new BBC Testcard (Testcard J) shows these extra pixels:
|

|

|
| Old Testcard edge | New Testcard J edge |
|
|
These 18 pixels are of course not square, converting them to square pixels gives:
|
|
18 x 1.094 = 20 square pixels
|
|
When making a 4:3 graphic on a square pixel device for conversion to a 720 by 576 (non square pixel) video image, the width of the 768 by 576 (square pixel) image must be increased to:
|
|
768 + 20 = 788 square pixels
|
making the 4:3 the square pixel graphic 788 by 576
These additional pixels are not taken into account when calculating the aspect ratio, but without them images transferred between systems will not be the correct shape.
Widescreen
A widescreen television picture has the same number of vertical lines as a 4:3 picture, that is 576. The aspect ratio is 16:9 making the picture:
|
| (576 x 16) ÷ 9 = 1024 square pixels wide |
| A widescreen picture "fits" into the same electronic space as a 4:3 image. The 16:9 widescreen (1024 by 576) image is horizontally squeezed to 702 by 576. The picture is distorted to be the correct shape on 16:9 screens only, hence tall thin people when the image is seen on a 4:3 screen.
The additional 18 pixels in the 4:3 picture, when stretched to 16:9 become: |
|
(18 x 4) ÷ 3 = 24 non square pixels or 24 x 1.094 = 26 square pixels
|
|
When making a 16:9 graphic on a square pixel device for conversion to a 720 by 576 widescreen video picture, the width of the 1024 by 576 image must be increased:
|
| 26 +1024 = 1050 by 576 square pixels |
16:9 Guide Graphic
The guide 16:9 graphic is a layered Photoshop image to down load. It can be used to help produce accurate widescreen graphics.
| How to Use The Guide Graphic |
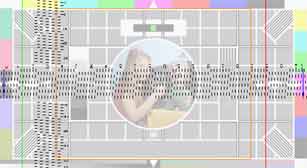 |
The download ZIP file (approx 475 Kb) contains a layered Photoshop PSD file (approx 1.7Mb). Unzip the file and open this PSD file. Replace the testcard (layer 1) with your graphic. This allows you to see all the cut off markers and safe areas. The vertical and horizontal pixel counters allow accurate positioning of graphic elements.
|
 |
|
| Use RGB levels (i.e. 0 to 255) and regularly check to see what it will look like when converted to 720 by 576. Finally save the graphic as a 720 by 576 file |
| Guide to the Layers in the Photoshop File |
| # | Content | Note |
| 1 | Testcard J | Compressed tiff file 1050 by 576 |
| 2 | Horizontal pixel counter | Starting at the edge of the 16:9 image |
| 3 | Additional pixel counter (1050/1024) | Starting at the edge of the image |
| 4 | 1050/1024 edge markers | Beginning and end of the 1024 16:9 image |
| 5 | Vertical pixel counter | Starting at the top of the image counting each line |
| 6 | Centre Cross | Vertical and horizontal centre lines |
| 7 | Caption safe area | Grid for text safe area |
| 8 | 14:9 picture area | Edge of the picture when converted to 14:9 letter-box |
| 9 | 4:3 picture area | Edge of the picture when converted to 4:3 |
| 10 | Logo Grid | For sizing independent logo - details here. |
|
14:9 Pillar-box
4 by 3 images can be transmitted as 14 by 9 pillar-box pictures as part of widescreen programmes. If graphics are added to the images extra care has to be taken to maintain safe areas.
Converting an image to 14:9 pillar-box crops a small amount at the top and bottom. The widescreen viewer sees thin black lines left and right. These are cut off when the programme is converted to 14:9 letter-box for analogue transmission.

| How to Use The Guide Graphic |
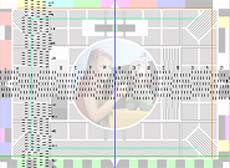 |
The download Zip file (approx 475 Kb) contains a layered Photoshop PSD file (approx 1.7Mb). Unzip the file and open this PSD file. Replace the testcard (layer 1) with your graphic. This allows you to see all the cut off markers and safe areas. The vertical and horizontal pixel counters allow accurate positioning of graphic elements.
|
|
|
| Use RGB levels (i.e. 0 to 255). Finally change the size of the graphic to 632 by 672 then crop it by changing the canvas size 720 by 576. This produces a 14:9 pillar-box graphic |
| Guide to the Layers in the Photoshop File |
| # | Content | Note |
| 1 | Testcard J | Compressed tiff file 788 by 576 |
| 2 | Horizontal pixel counter | Starting at the edge of the 4:3 image |
| 3 | Additional pixel counter (788/768) | Starting at the edge of the image |
| 4 | 788/768 edge markers | Beginning and end of the 768 4:3 image |
| 5 | Vertical pixel counter | Starting at the top of the image counting each line |
| 6 | Centre Cross | Vertical and horizontal centre lines |
| 7 | Caption safe area | Grid for text safe area |
| 8 | 14:9 cut-off markers | Area cropped by converting to 14:9 letter-box |
| 9 | 14:9 pillar-box caption safe | Grid for text safe area after conversion to 14:9 pillar-box |
|

