

Mark Gerow
Article Tools
| Printer-friendly Version | |
| Email this Article | |
| Comment on this Article | |
| Reprints & Permissions |
Build a Better Client-and-Matter Search
In the spirit of the New Year, I hereby predict that we have begun the third year of the "Year of Enterprise Search" which, due to the tremendous rate of innovation, will only last a total of five. We are now at the stage where search platforms include all the building blocks to create a truly user-friendly and effective search experience. In years four and five, the distinction between desktop and enterprise search will blur, and the need to understand concepts such as protocol handlers, incremental or full crawls, keywords or Boolean search expressions will decrease significantly. By that time, our enterprise search engines will "know" how to search content of virtually any type, whether local to my computer, on my firm's servers or on the other side of the globe.
This being year three, however, we still have some work to do to make search easy and intuitive for our end-users.
ENTER: SHAREPOINT SEARCH
In a Microsoft-centric computing environment, SharePoint Search is the logical enterprise search choice. Here I use the term "SharePoint Search" to refer to the search capability built into Microsoft Office SharePoint Server and its variants, such as Microsoft Search Server 2008.
SharePoint Search is easily customized and provides many built-in features, including automatic indexing of SharePoint content; "simple" and "advanced" search pages; and the ability to search skills, interests and related employee data as well as Microsoft Exchange content. With a bit of custom XML and XSLT coding, you can customize the advanced search page to search for firm-specific metadata; customize the search results layout; and access non-SharePoint data in the search results page using the Business Data Catalog.
With add-on products, it is possible to include documents from your Document Management System and non-Microsoft documents types such as Adobe PDF or AutoCAD drawings in SharePoint. And with JavaScript or the .NET framework, you can integrate full-text search into Web parts, Web-part pages or non-SharePoint applications and replace a poor performing full-text search engine in an existing DMS.
In this article we'll explore using JavaScript to create a custom search form to allow your users to easily search by client and matter number. With slight modification, the solution developed here can be used to search any combination of document properties exposed by the search engine.
OUR SCENARIO
If you've spent much time with SharePoint Search you're familiar with the concept of list fields, which are specific metadata associated with documents and list items. For example, every list item has a "Title" field, added by SharePoint when the list is created. In many instances, you will add your own fields to lists and documents to track firm-specific metadata. And what data could be more ubiquitous in a law firm than the client and matter with which a particular document is associated?
Our scenario, then, will be to build a client/matter search form using a standard content editor Web part (CEWP) and some JavaScript, as shown in Figure 1.

Figure 1: The client/matter search form. Click image to enlarge.
This form prompts the end-user for a client# and matter#, as well as optional search text. The form will then construct a URL that includes a keyword search query using the values provided, call SharePoint Search and display the results. To accomplish this you'll need to do the following:
1. Add "ClientNumber" and "MatterNumber" fields to at least one list or document library in your SharePoint installation.
2. Initiate a full index crawl on your "Local Office SharePoint Server sites" content source.
3. Map the "ClientNumber" and "MatterNumber" crawled properties to "managed" properties.
4. Create a new Web part page, add a "Search Core Results" Web part to the page, and verify that your new properties can be searched.
5. Add a CEWP to your Web part page containing the HTML and JavaScript to display the search form and execute the search.
The following section will provide detailed instructions for creating the above Client/Matter Document Search form. If you simply want to see the end result, skip to the section "Testing the form" later in this article.
BUILDING THE CLIENT/MATTER DOCUMENT SEARCH FORM
To perform all of the necessary steps you will need administrative rights to your SharePoint installation, or the assistance of someone with those rights. You will also need at least "Design" permission on a SharePoint site so that you can add the new ClientNumber and MatterNumber fields to a document library or list, and create and customize a new Web part page. If you're unsure whether you have sufficient permissions, your SharePoint administrator should be able to assist you.
Step 1: Add "ClientNumber" & "MatterNumber" fields.
Whenever you add a custom field to a list, SharePoint adds that field to the search index during the next full crawl that includes that list. The new field becomes what is known as a "crawled property," and the data in any instances of that field will automatically be included in the index. In our scenario we'll add two fields: "ClientNumber" and "MatterNumber." You can add these to any document library or list you wish on your SharePoint server.
Step 2: Perform a "full" crawl to force SharePoint to add new fields to the index.
SharePoint won't pick up the new ClientNumber and MatterNumber fields until the next full index crawl, so you need to perform one now. To do so you will need access to the SharePoint server's Central Administration Web site.
(a) Open the SharePoint Central Administration Web site and click on the link to the shared service hosting search, by default this will be named "SharedServices1."

Figure 2: Select Shared Services Provider from the Central Administration page .Click image to enlarge.
(b) Under the "Search" category click on the "Search administration" link.

Figure 3: Select the Search administration option. Click image to enlarge.
(c) Click on the "Content sources" link.

Figure 4: Select the Content sources option. Click image to enlarge.
(d) Mouse over a content source containing one or more document libraries or lists that include the "ClientNumber" and "MatterNumber" fields, and select the "Start Full Crawl" option. If you added these fields to a MOSS document library or list, choose the "Local Office SharePoint Server sites" content source.

Figure 5: Start a full crawl on the local SharePoint content source. Click image to enlarge.
Step 3: Map the new fields to "managed" properties to allow them to be searched by name
After the full crawl is complete, you need to map the new "crawled" properties to "managed" properties to allow SharePoint to search them explicitly. To do so, you'll open the "Metadata Properties" page as shown below:
(a) Click on the "Metadata Properties" link on the search administration page.

Figure 6: Open the Metadata properties page. Click image to enlarge.
(b) Select the "New Managed Property" link.
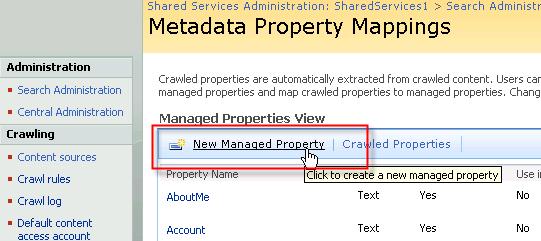
Figure 7: Add a new managed property. Click image to enlarge.
(c) Enter "ClientNumber" for the new property name, and then click on the "Add Mapping" button.

Figure 8: Create the "ClientNumber" managed property. Click image to enlarge.
(d) Although you named your field "ClientNumber" when you added it to your document library, internally SharePoint refers to it as "ows_ClientNumber." That is the crawled property you will map to your new "ClientNumber" managed property. When done click the "OK" button.

Figure 9: Mapping the crawled "ows_ClientNumber" property to the managed "ClientNumber" property. Click image to enlarge.
(e) Repeat steps 3(b) through 3(d) to create a "MatterNumber" managed property.
(f) Perform another full crawl, as in step 2(d) above, to make the new managed property available for searching.
Step 4: Create a new Web part page, add a "Search Core Results" Web part to the page, and verify that your new properties are available for searching
Once the second full crawl is complete, it's time to test the new "ClientNumber" and "MatterNumber" managed properties. To do so, you'll create a very simple search page, including just the "Search Core Results" Web part, and then pass a search query to that Web part using the page's URL.
(a) From the SharePoint site where you want your test page to reside, choose "Site Actions/Create"
Note: If you don't see the Site Actions/Create menu, it is because you do not have sufficient permissions on the current Web part page. Either select another page (or site), or ask your SharePoint administrator to grant you "Design" permissions for the current page (or site).
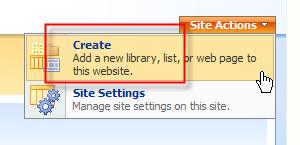
Figure 10: Selecting the Create option. Click image to enlarge.
(b) Create a new "Web Part Page"

Figure 11: Creating a new Web part page. Click image to enlarge.
(c) Name the new page "ClientMatterTest" and save it to an available document library.

Figure 12: Naming the new page and selecting a layout. Click image to enlarge.
(d) Open the new page in edit mode, and add a "Search Core Results" Web part to the page. The Search Core Results Web part comes with MOSS, and is designed to query the SharePoint search indexes based on values passed in the URL of the page on which it's placed.

Figure 13: Adding the Search Core Results Web part Click image to enlarge.
which it's placed.
(e) Exit edit mode, and append the text ?k=ClientNumber:"<client#>" where <client#> is replaced with a client number you have entered into the "ClientNumber" field in one or more of your documents or list items in SharePoint. The following example shows a valid client # at my firm:

Figure 14: Appending a search query to the end of the page URL. Click image to enlarge.
(f) You should see results similar to that shown in Figure 15.

Figure 15: The search results. Click image to enlarge.
The fact that the Search Core Results Web part reads its search query from the "k=" parameter of the Web page URL means that any mechanism that appends a valid search query string to this page's URL will cause SharePoint to execute a search and return the results. Thus the Search Core Results Web part can form the basis of a virtually limitless range of forms-based or automated search applications.
Step 5: Add a new Content Editor Web part to a Web part page and add JavaScript to display the form.
Here we cover the HTML and JavaScript that will be placed inside the CEWP to display the search form and execute the query. First, you'll need to add a new CEWP to the top of your Web part page, above the Search Core Results Web part. The code below will be added to the CEWP by selecting its "Modify Shared Web Part" option, then clicking the "Source Editor …" button to open its source editor dialog.
(a) This first block is optional, and provides a <style> to format the input fields.
<style>
input.searchField {
.background-color: LightYellow;
}
td.searchHeading {
.font-weight: bold;
}
</style>
(b) The <table> block contains the fields into which the end-user will enter the client#, matter# and optional search text, as well as the "search" button that will initiate the search.
<table>
<tr>
<td class='searchHeading'>Client#</td>
<td class='searchHeading'>Matter#</td>
<td class='searchHeading'>Other Search Text</td>
<td/>
</tr>
<tr>
<td><input id='ClientNumber' class='searchField' value=''/></td>
<td><input id='MatterNumber' class='searchField' value=''/></td>
<td><input id='OtherText' class='searchField' value=''/></td>
<td><input type='button' value='Search' onclick='performSearch()'/></td>
</tr>
</table>
(c) The following script will do the work of taking the user-supplied data, creating a valid search expression and issuing the search call. Detailed comments are embedded in the JavaScript to help explain what's going on. Pay particular attention to code block #1, which contains global variables you will need to modify to allow the code to work in your SharePoint environment.
<script>
// #1: Globals to control form – REPLACE with values
// appropriate to your installation
// -------------------------------------------------
// The following two variables contain the names of the
// "managed properties" defined earlier.
var ClientManagedPropertyName = 'ClientNumber';
var MatterManagedPropertyName = 'MatterNumber';
// This variable is set to the Url of the page which contains
// the Search Core Results Web part to display the results. In
// this example the Url is the same as that containing our
// Client/Matter Document Search form.
var ResultsPageUrl = 'http://<path_to_your_results_page>/ClientMatterTest.aspx';
// #2: Code to pre-fill Client#, Matter#, and other text
// search fields when page is refreshed
// -------------------------------------------------
// Get the current page's querystring
var qs = location.search.substring(1, location.search.length);
// Strip out any special 'escape' characters from the querystring
qs = qs.replace(/\+/g, ' ');
qs = decodeURIComponent(qs);
// Create an array to hold each querystring parameter
var args = qs.split('&');
// Find the 'k' parameter, which contains
// the keyword search string
for (var i=0; i < args.length; i++) {
// When the 'k' parameter found, extract
// the <ClientManagedPropertyName> and <MatterManagedPropertyName>,
// and other search text parameters (they will be in positions
// 0, 1, and 2 respectively
if (args[i].split('=')[0].toLowerCase()=='k') {
// Place the 'k'eyword parameters
// into an array
var keywords = (args[i].split('=')[1]);
// Assume ClientNumber in position 0, after the ':' character
var clientNumber = keywords.split(' ')[0].split(':')[1];
// strip off leading and trailing "
clientNumber = clientNumber.substring(1,clientNumber.length-1);
// Assume MatterNumber in position 1, after the ':' character
var matterNumber = keywords.split(' ')[1].split(':')[1];
// strip off leading and trailing "
matterNumber = matterNumber.substring(1,matterNumber.length-1);
// Other text contains all the rest of the parameters
var otherText = '';
for (var j=2; j<keywords.split(' ').length; j++) {
// separate words with a single space
if (otherText>'') otherText += ' ';
otherText += keywords.split(' ')[j];
}
// If values found in the querystring, fill in the corresponding
// fields on our form
document.getElementById('ClientNumber').value = clientNumber;
document.getElementById('MatterNumber').value = matterNumber;
document.getElementById('OtherText').value = otherText;
}
}
// ---------------------------------------------------------------
// #3: When the "Search" button is clicked, call the page with
// a querystring based on values user has entered into the
// Client#, Matter#, and other text fields
// --------------------------------------------------------
function performSearch() {
var clientNumber = document.getElementById('ClientNumber').value;
var matterNumber = document.getElementById('MatterNumber').value;
var otherText = document.getElementById('OtherText').value;
var page2show = ResultsPageUrl
+ '?k=' + ClientManagedPropertyName + ':"' + clientNumber + '" '
+ MatterManagedPropertyName + ':"' + matterNumber + '" '
+ otherText;
window.location = page2show;
}
</script>
TESTING THE FORM
After saving your content editor Web part you should see a page that looks similar to that shown in Figure 16:

Figure 16: The completed Client/Matter Search form. Click image to enlarge.
All that remains is to enter a valid client #, matter # and (optional) search text to display those documents and list items on your SharePoint server that have matching values in their associated "ClientNumber" and "MatterNumber" fields, or "other search text" values embedded anywhere in their text.
CONCLUSION
As you can see, at the opening of year three of "The Year of Enterprise Search," those of us running MOSS not only have a robust enterprise search tool, but also numerous options to customize it.
Microsoft's enterprise search offering, found in MOSS and its variants, provides a powerful and cost-effective enterprise search tool for law firms of all sizes. By automatically indexing fields added to SharePoint document libraries and lists, SharePoint makes it relatively easy to add legal-specific metadata to content and expose that data through standard or customized search pages, such as the one described in this article.
By combining the native power of SharePoint Search with just a bit of customization, you can significantly enhance its power as a search tool for your attorneys and staff.
Happy New Year!
Mark Gerow has more than 20 years of experience in IT, professional services and software product development and has provided consulting services to hundreds of companies throughout the San Francisco Bay Area and Northern California. He currently works for Fenwick & West, where he leads the application development team and is responsible for defining and implementing the firm's intranet and extranet strategies using SharePoint technologies.