From MP3Car.com Wiki
[edit] What can it do
- 12 or 24db/octave crossovers
- Parametric EQ
- Time Alignment for 2way front setup + sub
- Time Alignment for 3way front setup + sub (must use 7.1/8 channel Creative Compatible card) However, the plugin called "thesmalldelay" needs to have it's maximum delay setting reprogammed
[edit] Things you need
[edit] Software
- KX Drivers - newer ones available from the www.driverheaven.net forums instead of the kxproject website.
- UFX effects plugins also available from www.driverheaven.net
- ProFX plugins are optional also available from www.driverheaven.net
[edit] Hardware
- Any one of these supported cards
[edit] Supported cards |
| 10k1 based |
| Card name: |
Model: |
Notes:* |
|
Emu Creation Studio
Emu Audio Production Studio
Soundblaster PCI 512
Soundblaster PCI 512
Soundblaster Live! Value
Soundblaster Live! Value OEM
Soundblaster Live! Value OEM
Soundblaster Live!
Soundblaster Live!
Soundblaster Live!
Soundblaster Live!
Soundblaster Live! 5.1
Soundblaster Live! 5.1
Soundblaster Live! 5.1 Platinum
|
EMUCRS
EMUAPS
CT4790
SB0150
CT006x
CT4670
CT478x
CT483x
CT487x
CT4760
CT4620
SB0060
SB010x
SB0060
|
Professional Grade
Professional Grade
4.0
4.0
4.0
4.0
4.0
4.0
4.0
4.0
4.0
5.1
5.1
5.1, Internal Drive
|
| 10k2 based |
| Card name: |
Model: |
Notes:* |
Soundblaster Audigy
Soundblaster Audigy
Soundblaster Audigy
Soundblaster Audigy
Soundblaster Audigy Platinum
Soundblaster Audigy ES (OEM)
Soundblaster Audigy 2
Soundblaster Audigy 2 Platinum
Soundblaster Audigy 2 Platinum EX
Soundblaster Audigy 2 Platinum EX
Soundblaster Audigy 2 Platinum EX
Soundblaster Audigy 2 ZS
Soundblaster Audigy 2 ZS Platinum
Soundblaster Audigy 2 ZS Platinum
|
CT007x
SB009x
SB019x
SB023x
SB0090
SB016x
SB024x
SB0240
SB0280
SB0290
SB0320
SB0350
SB0250
SB035x
|
5.1, I2S Codec Present
5.1, I2S Codec Present
5.1, I2S Codec Present
5.1, I2S Codec Present
5.1, I2S Codec Present
5.1, I2S Codec Present, Internal Drive
6.1, I2S Codec Present
6.1, I2S Codec Present, Internal Drive
6.1, External Drive, no AC97
6.1, External Drive
6.1, External Drive
7.1, I2S Codec Present
7.1, I2S Codec Present, Internal Drive
7.1, I2S Codec Present, Internal Drive
|
[edit] Partially Supported |
| Card name: |
Model: |
Chip: |
Notes:* |
Soundblaster Live! 5.1
Soundblaster Audigy 2 Value
Soundblaster Audigy 2 ZS Platinum Pro
Soundblaster Audigy 2 ZS Platinum Pro
Soundblaster Audigy 2 ZS Notebook
Soundblaster Audigy 4
Soundblaster Audigy 4 Pro
|
SB022x
SB0400
SB0290
SB0360
SB0530
SB0610
SB0380
|
10k1
10k2
10k2
10k2
10k2
10k2
10k2
|
5.1, mostly supported
7.1, I2S Codec Present, mostly supported
7.1, External Drive, random Line in codec noise
7.1, External Drive, random Line in codec noise
7.1, PCMCIA, spdif not working, record in ASIO only
7.1, I2S Codec Present, reported to work,
7.1, External Drive, reported to work,
|
[edit] Unsupported Cards |
| Card name: |
Model: |
Chip: |
Notes:* |
|
Sound Blaster Live! 5.1 Dell OEM
Soundblaster Live! 24 Bit
Soundblaster Live! 24 Bit
Soundblaster Audigy LS
Soundblaster Audigy SE
Soundblaster Audigy Value
Soundblaster USB (All cards)
Soundblaster X-Fi (All cards)
EMU Pro Cards (0404/1212/1820)
|
SB020x
SB041x
SB049x
SB031x
SB0570
SB0570
SBxxxx
SBxxxx
E-xxxx
|
10kx
ESI
ESI
ESI
ESI
ESI
USB
20kx
10k2
|
5.1
7.1
7.1
7.1
7.1
7.1
x.x
x.x
Professional Grade
|
- 4.0,5.1etc refer to the largest speaker configuration available with this card.
- "I2S Codec Present" refers to the presence of the secondary analogue I2S input codec
|
All registered trademarks are property of Creative Labs
Info from http://www.kxproject.com
[edit] How to
More to come later...
This is an example using a Creative Audigy1 5.1 Card.
1) Uninstall creative drivers and download and Install KXdrivers version 3538 or later available at www.driverheaven.net, not the kxproject website (those are outdated)
2) Download and install the "ProFX" and "UFX" effects plugin packs also available at www.driverheaven.net. These will have the crossover, timebalance plugins and some other more advanced EQ plugins if you don't want to use EQ's inside Winamp.
3) Open up KXproject
4) Click on 4xDSP. Everything you do will be in the 4xDSP screen.

Then you have a screen that looks like this:

You only need a few plugins to make it work.
- FXBUS
- PROLOG
- XROUTING
- EPILOG
All I did was delete or “Unload” the plugins I didn’t need by right clicking at the top of them and selected "Unload".

5) Now we need to add the fun stuff. The plugins to do crossover, and time delay, and EQ(optional). To add a plugin, right click anywhere in the screen. Then select “add effect/plugin.”

For the crossover you can select 2nd order for 12dB/octave or 4th order for 24 dB/octave. Crossover-2 and Crossover-4 are 12 and 24dB/octave crossover available from the ProFX package and will do the same thing.
6) If you want a 2 way crossover, you only need to add on instance of it. If you want a 3-way, add two instances. I will show a basic setup of High pass at and a low pass to sub.
7) I added two 2nd order crossovers and now we need to connect them to the inputs and the outputs.
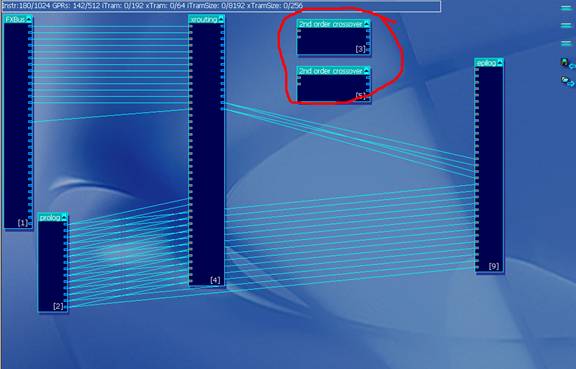
8) Go to the Xrouting and hover the mouse over one of the square dots to see what that connects to. Then connect the following:
- Stereo_l to in1
- Stereo_r to in2
Connect this to both crossovers as shown here by clicking and dragging a connection over:
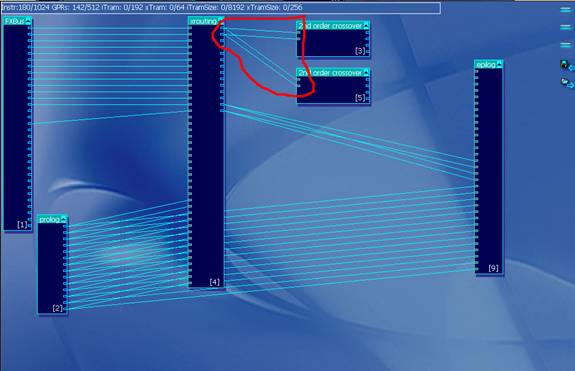
9) Now all we need to do is connect the output of the crossover to the output of the card. To do connect the following in this order it will be easier. If you connect from the crossover to epilog, it will auto connect everything for you and we don’t want that. Connect from right to left instead:
- Epilog(Analog Front Left) to 2nd order crossover(h1)
- Epilog(analog Front Right) to 2nd order crossover(h2)
- Epilog(Analog Rear Left) to 2nd order crossover #2(h1)
- Epilog(Analog Rear Left) to 2nd order crossover #2(h2)
- Epilog(Sub) to 2nd order crossover (l1)
- Epilog(Center) to 2nd order crossover (l2)

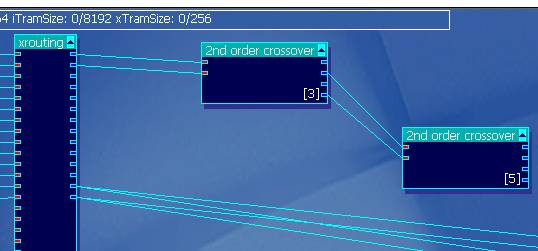
10) Now click in the 2nd order crossover box and now you can adjust the crossover frequency. Like this

That is how you setup a basic high pass filter on your speakers and a lowpass filter on your subwoofer/center output.
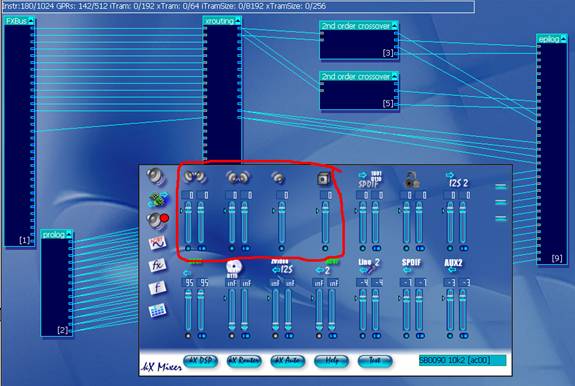
12) You can adjust the levels by clicking on the epilog box. I recommend that you play with the adjustments to make sure which jacks are routed to what and what crossover controls each output.
13) You can save your settings by clicking on the floppy icon on the right.
14) Now if you want to do a 3 way crossover (no rear speakers), you can reconnect some things. To disconnect your “wiring” right click on the connectors you want to disconnect.

15) Take the #2 2nd order crossover and connect and the in1 to the h1 of the first 2nd order crossover, and the in2 to the h2 of the first 2nd order. You might have to disconnect a wire after doing the first in1 to do the second in2.
16) Now we want to connect to the outputs. Connect the following:
- Epilog (Analog Center) – First 2nd order(l1)=Subwoofer
- Epilog (Analog Sub) – First 2nd Order(l2)=Subwoofer
- Epilog (Analog Front Right) – Second 2nd order (l1)=Midbass
- Epilog (Analog Front Right) – Second 2nd order (l2)=Midbass
- Epilog (Analog Rear Left) – Second 2nd order (h1)=Tweeter
- Epilog (Analog Rear Right) – Second 2nd order (h2)=Tweeter

17) Now you have a 3-way crossover. The first crossover will control the LPF for the sub and the HPF for the midbass speakers. The second crossover will control the LPF part for the midbass and the HPF for the tweeter.
You could make add in another crossover if you want to control and have overlapping/underlapping frequencies.
18) the final part would be to add the time delay. First add the plugin called “mono mix” under the basic plugins. You wll need this to mix the stereo signal to mono for the subwoofer. Then add the time balance plugin. Use the plugin called “TimeBalanceV2”.

19) Just connect the proper channels and play around with it. You will have to disconnect the connectors you don’t want connected each time you make a connection since it automatically tries to decide how you should have it connected. Here is my final example.
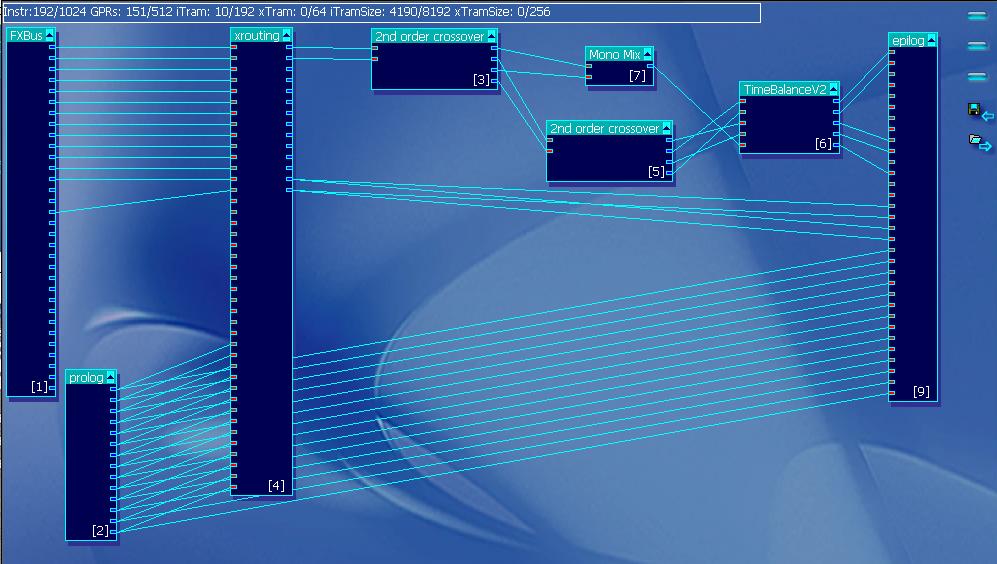
In my example here is how its connected:
- Analog Front Left = Tweeter Left
- Analog Front Right = Tweeter Right
- Analog Rear Left = Midbass Left
- Analog Rear Right = Midbass Right
- Analog Sub = Sub
And now you can adjust the time delays for all the speakers.

You are on your own here. I will let you experiment, but hopefully this will give you some understanding on how you can use this for your needs.


