Go To Page..
Main Page
Logging In/Out
Your Computer
Windows 98
Microsoft Office 2000
GroupWise 5 Email
Internet
Student Attendance
Student Grade Reporting
Student Records (CIMS)
Microsoft PowerPoint
Microsoft Access
Microsoft Office Main
Microsoft Word
Microsoft Excel
Introduction into Microsoft Publisher
Starting Up Microsoft Publisher
Creating a publication with a wizard
Quick Publication Wizard with a blank publication
Create a new publication based on a template
Start a publication from scratch
Open an existing publication
Pack your publication to take to another computer
Set up a publication for black and white commercial printing
Introduction into Microsoft Publisher
Microsoft Publisher 2000 helps you easily create, customize, and publish materials such as newsletters, brochures, flyers, catalogs, and Web sites. Publish easily on your desktop printer
This tutorial will help you get started with Microsoft Publisher and may solve some of your problems, but it is a very good idea to use the Help Files that come with Microsoft Publisher, or go to Microsoft's web site located at
http://microsoft.com/office/publisher/default.htm
for further assistance.
Back to top
Starting Microsoft Publisher
Two Ways
Double click on the Microsoft Publisher icon on the desktop.
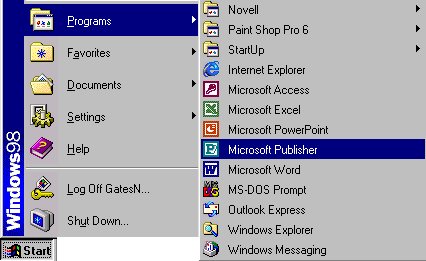
Click on Start --> Programs --> Microsoft Publisher
Back to top
Creating a publication using a wizard
On the
File
menu, click
New
Click the
Publications by Wizard
tab
In the Wizards pane, click the type of publication you want
In the right pane, click the design you want
Click
Start Wizard
To make changes to the publication's color scheme, layout, or personal information now, click
Next
and step through the wizard's questions to make the desired changes.
When you finish making changes, click
Finish
In you publication replace the placeholder text and pictures with your own or with other objects.
On the
File
menu, click
Save
In the
Save In
box, select the folder where you want to save the new publication
In the
File name
box, type a name for your publication
Click Save
Back to top
Using the Quick Publication Wizard with a blank publication
On the
File
menu, click
New
In the Catalog, click
Blank Publications
Click the publication type you want and then click
Create
In the
Quick Publication Wizard
pane, click the option you want
In the bottom pane, follow the instructions provided
Repeat steps 4 and 5 for each option
On the
File
menu, click
Save
In the
Save In
box, select the folder where you want to save the new publication
In the
File name
box, type a name for your publication
Click Save
Back to top
Create a new publication based on a template
On the
File
menu, click
New
Click
Templates
Double-click the template you want to use for your publication. (
Publisher opens a copy of the template
)
Make the changes you want to create a new publication
On the
File
menu, click
Save
In the
Save In
box, select the folder where you want to save the new publication
In the
File name
box, type a name for your publication
Click Save
Back to top
Start a publication from scratch
On the
File
menu, click
New
Click the
Blank Publications
tab
Click the publication type you want and then click
Create
OR
If you do not see the type of publication you want, click
Custom Page
at the bottom of the Catalog, and then choose the options you want
On the
File
menu, click
Save
In the
Save In
box, select the folder where you want to save the new publication
In the
File name
box, type a name for your publication
Click Save
Back to top
Open an existing publication
On the
File
menu, click
Open
Click the publications you want to open, and then click
Open
.
If you do not see the file you want, switch to the drive or folder you previously saved it in.
Back to top
Create a table and type text into it
On the
Objects
toolbar, click the
Table Frame Tool
Position the pointer where you want a corner of the table to appear, and then drag the mouse diagonally
In the
Create Table
dialog box, choose the options you want. As you click different table formats, the
Sample
box displays them
Click
OK
In the table, click where you want to add text, and then start typing. (The table automatically expands when your text fills the cell, unless you lock the table)
Move to the next cell you want to type in
Back to top
Pack your publication to take to another computer
On the
File
menu, point to
Pack and Go
, and then click
Take to Another Computer
. The Pack and Go Wizard takes you through each step of the packing process. Click
Next
to move to the next step.
If you haven't saved your publication already, the wizard will ask you to save it
If you're taking your publication on disk to another computer, when the wizard asks you to choose a location for saving your file, click
A:
OR
If you're putting your files on an external drive, on a network, or on your computer's hard disk, click
Browse
, choose the drive and folder you want, and then click
OK
Click
Next
To embed TrueType fonts and to create links for embedded graphics, click the options you want and add a check mark.
OR
To not include linked graphics, click to remove the check mark.
Click
Next
Click
Finish
In Publisher cannot find a linked graphic while packing your publication do one of the following:
Click
Retry
after you insert the disk or CD-ROM containing the original graphic into the appropriate drive.
Click
Skip
to leave the current link and replace the graphic later
Click
Browse
to locate a graphic that has been moved or to select another graphic and link it.
Insert another disk if Publisher prompts you, and click
OK
.
Remember the ordering of your disks for when you unpack them
Click
OK
Unpack.exe
is the program you use to unpack your files, which will be on the first disk.
Back to top
Set up a publication for black and white commercial printing
On the
Tools
menu, point to
Commercial Printing Tools
, and then click
Color Printing.
Black and White Printing
In the
Print all colors as
box, click
Spot color(s)
, and then click
Change Spot Color
.
In the
Choose Spot Color
dialog box, click
Black and white only
.
Click
OK
twice
Process-color printing
In the
Print all colors
as box, click
Process colors (CMYK)
.
Click
OK
Spot-color printing
In the
Print all colors
as box, click
Spot color(s)
, and then click
Change Spot Color
.
In the
Choose Spot Color
dialog box, click the arrow next to
Spot color 1
, and then choose the color you want.
To choose a color that is not currently used in the publication, click
More Colors
, choose the color you want, and then click
OK
To choose a
second spot color
, click the check box to the left of
Spot color 2
, and then click the arrow to the right and click the
second spot color
Click
OK
twice
Back to top